Thursday 28 September 2023

An LLM-based document and data Q&A App (with knowledge graph visualization)

This blog has moved to Medium.

I built this app because I'm writing some chapters for an upcoming book on Streamlit. This app helps me digest a large quantity of information from articles and documents I have on the subject of Software Architecture. I wanted to be able to ask questions about the documents and get answers, and also to visualize the answers in a knowledge graph. I also wanted to upload Excel files and ask questions about the data in the files.

The application is a typical LLM application, with the addition of a knowledge graph visualization. The app is built in Python using Streamlit. I was inspired by instagraph and re-implemented its graph plot as a Streamlit custom component. I use:

  • I use Weaviate Cloud (vector) Store (WCS) for document and data indexing.
  • OpenAI, LangChain, and LlamaIndex LLM programming frameworks play an important role too.
  • The application supports local filestore indexing in addition to WCS.
  • OpenAI embeddings are used and the OpenAI API is called, directly or via the other LLM frameworks, for question answering.
  • You will need an OpenAI API key to use the application.
  • Various LLM models are used for question answering, including the GPT-3.5 Turbo and GPT-4 models. Both their chat and completions variants are used.
  • Token usage is tracked and costs are estimated.

The application is deployed on Streamlit Cloud. When deployed in the cloud, the application uses WCS. When deployed locally, the application can be configured to use LlamaIndex to store its index in the local file system.


🚀 Try the app yourself.


Wednesday 29 March 2023

Using ChatGPT to build a Kedro ML pipeline

This blog has moved to Medium.


I recently came across an open-source Python DevOps framework Kedro and thought, “Why not have ChatGPT teach me how to use it to build some ML/DevOps automation?” The idea was to write my questions with hints that encouraged explanations of advanced Kedro features (to evolve incrementally as if a teacher taught me).

I planned to ask ChatGPT how to:

  1. Use basic Kedro.
  2. Use more advanced features in the Kedro framework.
  3. Display pipeline graphs in Streamlit.
  4. Build an example ML model and explicitly refer to it in the Kedro pipeline.
  5. Scale the pipeline and perform pipeline logging, monitoring, and error handling.
  6. Connect Kedro logs to a cloud-based logging service.
  7. Contrast Kedro with similar (competing) products and services and show me how the earlier-developed pipeline could be implemented in one of them.

I wrote a blog post with annotated responses to the answers I got to my questions. I was super impressed and decided to implement the Kedro pipeline and Streamlit application as planned from what I learned. My GitHub repository contains all the code for the application.

As you'll read in my blog post ChatGPT helps "understanding" and is why I found it useful for learning. The Kedro code ChatGPT generated was simplistic and in some cases wrong, but perfectly okay to get the gist of how it worked. My app is original, with small parts of it taken from Kedro's code template, so you're free to use it without any recourse under the MIT license.

Try the Streamlit app yourself running in the Streamlit Cloud.

Streamlit App

  • The source OCLH crypto currency data is supplied in a single CSV file, and was previously downloaded from the Bitfinex exchange
  • OCLH data is for 4 coins spanning the period June 1, 2022 to December 31, 2022
  • OCLH data is in 15min frequency
  • A Kedro data catalog of source and feature datasets is built for each coin and subsequently used in the Kedro ML pipeline
  • You can run the Kedro ML pipeline to train, test and evaluate a Linear Regression model to predict next period (t+1) close prices from several feature techical indicators derived from the close price and volume
  • You can visualize candlestick and line charts for the source and feature datasets, by coin
  • Run locally, you can visualize an interactive graph representation of the Kedro pipeline in the Streamlit application
  • You can run the pipeline nodes and the pipeline visualization from the command line too, using Kedro's CLI tools

For Streamlit beginners, this application can be useful to learn how to:

  • Structure a multipage application
  • Use session state
  • Use widget callbacks
  • Use many different widgets
  • Launch sub-processes
  • Embed external GUIs
  • Cache data and clear caches
  • Plotly charting
  • (Check out my gists for more Streamlit goodies)

Friday 30 September 2022

Streamlit User and API Authentication with Auth0 Next.js SDK

This blog has moved to Medium.

I was lucky enough to write a couple of guest articles for the Auth0 blog on the topic of integrating Auth0 authentication with Streamlit. You can find the full articles here:

Introduction to Streamlit and Streamlit Components

This article will show you how to build Streamlit apps and custom Streamlit Components, with the end goal of implementing Auth0 authentication of Streamlit apps using Streamlit Components

https://auth0.com/blog/introduction-to-streamlit-and-streamlit-components/

Streamlit User and API Authentication with Auth0 Next.js SDK

In this article, I will show you how to build a Streamlit Component to authenticate users in Streamlit applications and external APIs with Auth0.

https://auth0.com/blog/streamlit-user-and-api-authentication/

Friday 1 October 2021

Streamlit toggle buttons component

This blog has moved to Medium.

TL;DR: Implementation of toggle buttons as a pure static HTML/JS Streamlit component. The key learning from this sample application is that the Streamlit app server and front end web server are not required to be separate. The component implementation is in a plain HTML/JS file, which is loaded, executed and rendered directly from the Streamlit app server.

Get the code from GitHub

https://github.com/asehmi

Demo


Demo Multipage App

You can find a complete mini multipage app implementation in `./frontend_multipage_app`, which uses this simple framework. Run the app from the root folder:

```
$ streamlit run multipage_app.py
You can now view your Streamlit app in your browser.

  Local URL: http://localhost:8765
  Network URL: http://192.168.1.100:8765
```

Overview

The component's front end implementation is in the `./frontend/` folder. There are two files here, `__init__.py` and `index.html`.

`./frontend/__init__.py`

This code (the presence of `__init__.py` makes it a Python module, actually) simply declares the component using Streamlit's `components.declare_component` API and exports a handle to it. This handle is `component_toggle_buttons`. You can see the `path` to the component is the same folder. When Streamlit loads the component it will serve the default `index.html` file from this location.

import streamlit.components.v1 as components
component_toggle_buttons = components.declare_component(
    name='component_toggle_buttons',
    path='./frontend'
)

`./frontend/index.html`

This self-contained file does the following:

  1. Draws a simple HTML user interface with styled buttons, in two class groups
  2. Loads JavaScript which implements core Streamlit component life cycle actions, namely the ability to:
  • Inform Streamlit client that the component is ready, using `streamlit:componentReady` message type.
  • Calculate or get it's own visible screen height, and inform Streamlit client, using `streamlit:setFrameHeight` message type.
  • Handle inbound `message` events from the Streamlit client; with `streamlit:render` event type being critical.
  • Send values (i.e., objects) to the Streamlit client application, using `streamlit:setComponentValue` message type.

<html>
<head>
  <style type="text/css">
  <!-- Removed for brevity -->
  </style>
</head>

<!--
----------------------------------------------------
Your custom static HTML goes in the body:
-->

<body>
  <h2 id="group_1_header">Awaiting value from Streamlit</h2>
  <input type="button" id="0" value="Action 1.1" class="btn_group_1 off" onclick="toggle(this, 'btn_group_1');">
  <input type="button" id="1" value="Action 1.2" class="btn_group_1 off" onclick="toggle(this, 'btn_group_1');">
  <input type="button" id="2" value="Action 1.3" class="btn_group_1 off" onclick="toggle(this, 'btn_group_1');">

  <h2 id="group_2_header">Awaiting value from Streamlit</h2>
  <input type="button" id="0" value="Action 2.1" class="btn_group_2 off" onclick="toggle(this, 'btn_group_2');">
  <input type="button" id="1" value="Action 2.2" class="btn_group_2 off" onclick="toggle(this, 'btn_group_2');">
  <input type="button" id="2" value="Action 2.3" class="btn_group_2 off" onclick="toggle(this, 'btn_group_2');">

  <div id="message_div">
    <br /><span id="message_label">Awaiting value from Streamlit</span>
  </div>
</body>

<script type="text/javascript">
  // ----------------------------------------------------
  // These functions should be used as is to perform required Streamlit 
  // component lifecycle actions:
  //
  // 1. Signal Streamlit client that component is ready
  // 2. Signal Streamlit client to set visible height of the component
  //    (this is optional, in case Streamlit doesn't correctly auto-set it)
  // 3. Pass values from component to Streamlit client
  //

  // Helper function to send type and data messages to Streamlit client

  const SET_COMPONENT_VALUE = "streamlit:setComponentValue"
  const RENDER = "streamlit:render"
  const COMPONENT_READY = "streamlit:componentReady"
  const SET_FRAME_HEIGHT = "streamlit:setFrameHeight"

  function _sendMessage(type, data) {
    // copy data into object
    var outboundData = Object.assign({
      isStreamlitMessage: true,
      type: type,
    }, data)

    if (type == SET_COMPONENT_VALUE) {
      console.log("_sendMessage data: " + JSON.stringify(data))
      console.log("_sendMessage outboundData: " + JSON.stringify(outboundData))
    }

    window.parent.postMessage(outboundData, "*")
  }

  function initialize(pipeline) {

    // Hook Streamlit's message events into a simple dispatcher of pipeline handlers
    window.addEventListener("message", (event) => {
      if (event.data.type == RENDER) {
        // The event.data.args dict holds any JSON-serializable value
        // sent from the Streamlit client. It is already deserialized.
        pipeline.forEach(handler => {
          handler(event.data.args)
        })
      }
    })

    _sendMessage(COMPONENT_READY, { apiVersion: 1 });

    // Component should be mounted by Streamlit in an iframe, so try to autoset the iframe height.
    window.addEventListener("load", () => {
      window.setTimeout(function () {
        setFrameHeight(document.documentElement.clientHeight)
      }, 0)
    })

    // Optionally, if auto-height computation fails, you can manually set it
    // (uncomment below)
    //setFrameHeight(200)
  }

  function setFrameHeight(height) {
    _sendMessage(SET_FRAME_HEIGHT, { height: height })
  }

  // The `data` argument can be any JSON-serializable value.
  function notifyHost(data) {
    _sendMessage(SET_COMPONENT_VALUE, data)
  }

  // ----------------------------------------------------
  // Your custom functionality for the component goes here:

  function toggle(button, group) {
    buttons = document.getElementsByClassName(group)
    console.log(buttons)
    for (let i = 0; i < buttons.length; i++) {
      console.log(buttons.item(i))
    }

    for (let i = 0; i < buttons.length; i++) {
      if (button.id == String(i) & button.className.includes("off")) {
        button.className = group + " on"
      } else if (button.id == String(i) & button.className.includes("on")) {
        button.className = group + " off"
      } else {
        buttons.item(i).className = group + " off"
      }
    }

    buttons = document.getElementsByClassName(group)
    actions = []
    for (let i = 0; i < buttons.length; i++) {
      btn = buttons.item(i)
      actions.push({ "action": btn.value, "value": btn.className.includes("on") })
    }

    states = {}
    states['choice'] = {
      "name": group,
      "state": {
        "action": button.value,
        "value": button.className.includes("on")
      }
    }
    states["options"] = { "name": group, "states": actions }

    notifyHost({
      value: states,
      dataType: "json",
    })
  }

  // ----------------------------------------------------
  // Here you can customize a pipeline of handlers for 
  // inbound properties from the Streamlit client app

  // Set initial value sent from Streamlit!
  function initializeProps_Handler(props) {
    let header1 = document.getElementById("group_1_header")
    header1.innerText = props.initial_state.group_1_header

    let header2 = document.getElementById("group_2_header")
    header2.innerText = props.initial_state.group_2_header
  }
  // Access values sent from Streamlit!
  function dataUpdate_Handler(props) {
    let msgLabel = document.getElementById("message_label")
    msgLabel.innerText = `Update [${props.counter}] at ${props.datetime}`
  }
  // Simply log received data dictionary
  function log_Handler(props) {
    console.log("Received from Streamlit: " + JSON.stringify(props))
  }

  let pipeline = [initializeProps_Handler, dataUpdate_Handler, log_Handler]

  // ----------------------------------------------------
  // Finally, initialize component passing in pipeline

  initialize(pipeline)

</script>

</html>

In this basic component, notice `_sendMessage()` function uses `window.parent.postMessage()`, which is as fundamental as it gets. The value objects you send to the Streamlit client application must be any JSON serializable object. Conceptually they can be viewed as data or events carrying a data payload. Inbound message values received on `streamlit:render` events, are automatically de-serialized to JavaScript objects.

It's only illustrative, but I have also implemented a simple pipeline of inbound message handlers and a dispatcher. I show this being used to initialize component data values, update the user interface, and to log output to the console. See `*_Handler()` functions, `pipeline`, `initialize()` function.

The counterpart to the front end is the Streamlit application. Its entry point is in `app.py`. The `frontend` module is imported and the component handle, `component_toggle_buttons`, is used to create an instance of it. Interactions in the front end which give rise to value notifications will be received in the Streamlit client, which can be acted upon as required. I've provided simple design abstractions to make running of the component and handling its return values more explicit. They are `run_component()` and `handle_event()` respectively. This wrapping makes the implementation neater and it'll be conceptually easier to understand the implementation of more advanced components when you're ready to take the next step implementing React component front ends.

The HTML code for the toggle buttons groups a set of related buttons using a named class (my own convention). This group class name and the button instance is passed to the `onclick` handler, `toggle()`, which manages the styling for the `on/off` state, and creates a JSON object to hold the button group's current state and the state of the clicked button. The button `id`s in each group are numbered from `0` upwards (again by my own convention). Finally, the JSON object is communicated to the Streamlit client application using `notifyHost()`.

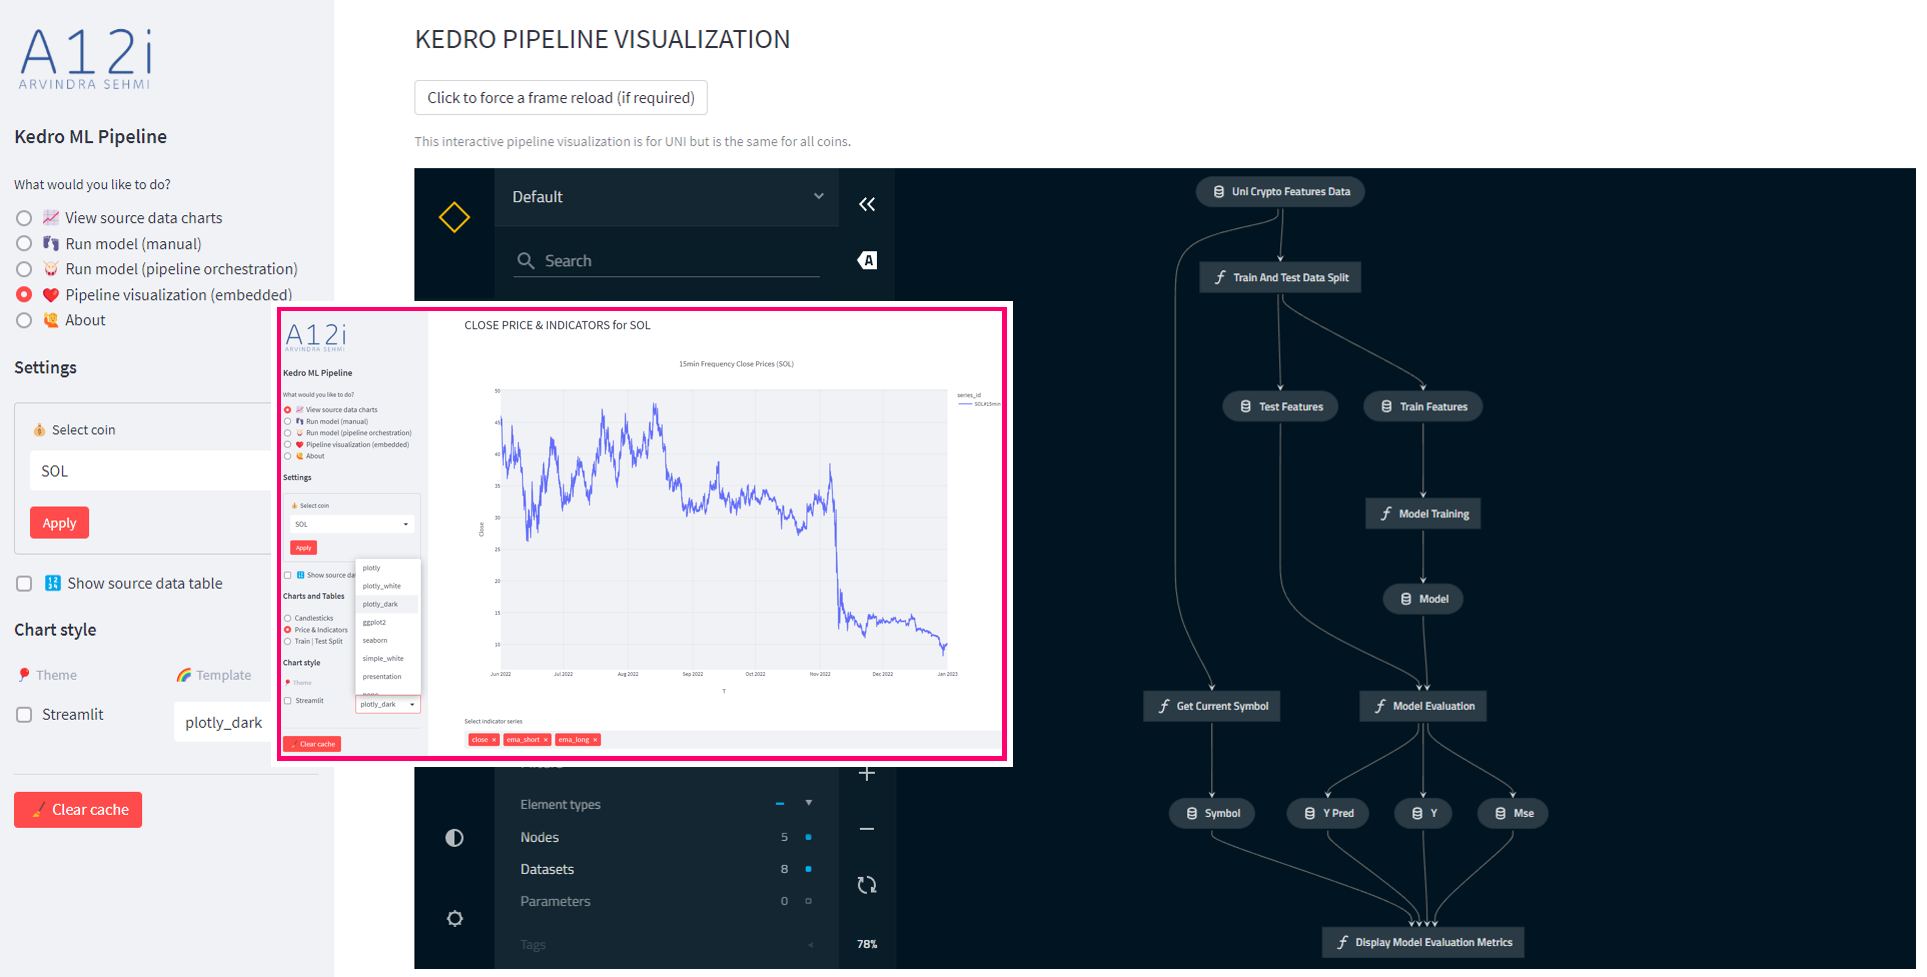
Here's a brief explanation of the user interface elements (pink is `on` and dark grey is `off`):


And below is an example of the JSON object sent to the Streamlit client, indicating that button `Action 2.3` in button group `btn_group_2` was clicked to the `on` state. In addition, the state of all buttons in the group `btn_group_2` is provided. Feel free to change the JSON payload schema to suit your own requirements.

{
  "choice": {
    "name": "btn_group_2",
    "state": {
      "action": "Action 2.3",
      "value": true
    }
  },
  "options": {
    "name": "btn_group_2",
    "states": [
      {
        "action": "Action 2.1",
        "value": false
      },
      {
        "action": "Action 2.2",
        "value": false
      },
      {
        "action": "Action 2.3",
        "value": true
      }
    ]
  }
}

Running the Toggle Buttons Component

The component is run in the same way as any Streamlit app.

  • Open a console window and change directory to the root folder of the cloned GitHub repo, where `app.py` is.
  • Now run the Streamlit server with this app.

$ streamlit run app.py
You can now view your Streamlit app in your browser.

  Local URL: http://localhost:8765
  Network URL: http://192.168.1.100:8765

  • The app should start on the default port (8765) and launch a browser window to display the main page.

Tuesday 24 August 2021

Auth Simple for Streamlit

This blog has moved to Medium.

I liked the simplicity of the username/password database authentication solution in this post (by madflier) over in the Streamlit discussion forum. I thought I'd have a go at making it more flexible and possibly production ready. My thought is contrary to madflier's objectives around simplicity, but since I've seen a lot of requests for simple database-backed authentication in the Streamlit discussion forum I felt it was worth the effort to take his solution one step further. I'm honored to be a member of Streamlit's Creators group and I the opportunity to work on my ideas in a recent Streamlit internal hackathon. Apologies to madflier! :-)

As a side note, I've already implemented a Streamlit component for Auth0 Authentication. That's definitely the way to go, but feel that the Streamlit community has been a little hesitant to take it up. Perhaps it's considered to be something for use in big enterprise applications? That's not my experience, given how easy it is to use Auth0. Streamlit components can get complicated and require separate Streamlit and web apps to make them work. So, perhaps something with fewer moving parts is more palatable for most folks (a) getting started with Streamlit, and (b) needing authentication to boot?

I've redesigned the original solution and added the following functionality:

  • Session state support so logins survive a Streamlit's top-down reruns which occur in it's normal execution.
  • Support for logoutauthenticated check, and a requires_auth function decorator to protect areas of your own apps, e.g. secure pages in a multi-page Streamlit application.
    • See how requires_auth is used to secure superuser functions in auth.py. You can do the same in your code.
  • Built-in authentication/login status header widget that will sit nicely in most Streamlit apps.
  • Refactored the SQLite local DB dependency in the main auth module so it uses a DB provider design pattern implementation.
  • Given the refactoring, I added a simple factory for multiple provider implementations, so different persistence technologies could be used, for example a cloud DB.

    • In fact, I built an Airtable cloud database provider which can replace SQLite as an alternative.
  • The abstract provider interface is super simple and should allow almost any database to be adapted, and it works fine for this specific auth use case in the implementations I created.

    • Some Streamliters have mentioned Google Sheets and Firebase - yep, they should be easy.
  • Configuration has been externalized for things like database names and locations, cloud service account secrets, api keys, etc. The configuration is managed in a root .env and env.py files, and small Python settings files for the main app (app_settings.py), and each provider implementation (settings.py).
  • There's just enough exception handling to allow you to get a handle on your own extension implementations.
  • I use debugpy for remote debugging support of Streamlit apps, and include a little module that makes it work better with Streamlit's execution reruns.

All code is published under MIT license, so feel free to make changes and please fork the repo if you're making changes and submit pull requests.

Saturday 7 August 2021

Retired from Oxford Economics

This blog has moved to Medium.

In pursuit of fun and to be my own boss for a while I’ve left Oxford Economics.

Other places to find me:

I'm proud and very fortunate to have been able to devote nearly ten years of my life to Oxford Economics, a great company with incredible prospects ahead. My experience was amazing, which I attribute to the great team that worked for me and many wonderful and smart people at OE. THANK YOU. It was rare to have been given the remit to redesign (rip-and-replace) the entire IT landscape at the organisation - products, platforms, services, and IT team - whilst keeping the business running. These were quite incredible times with plenty of good and bad memories which I'll enjoy and reflect upon for many years to come (I hope!).

I’m excited about AB/NED roles I've lined up in various tech start-ups; plus education, coaching and mentoring activities in various technical communities in US, UK and East Africa. A personal goal is to play consistently to my 7 handicap in golf, and even bring it down a notch or two! I will be busy which is just how I like it.

This is one of the first pictures I drew 9+ years ago to help me tell part of the story of an integrated set of secure cloud services - no boxes, no lines, just a cozy bundle of loosely coupled but neatly composed services.